Quick Summary
- Hand block printing is an entirely manual process where carved wooden blocks are stamped onto fabric, one impression at a time, using dye or pigment.
- The process has multiple distinct stages: fabric preparation, block making, colour preparation, printing, drying and finishing. Each stage requires specialist skill.
- Wooden blocks are soaked in oil before their first use to strengthen the wood and ensure clean, consistent impressions over years of use.
- Colour is applied to a padded ink tray, transferred evenly onto the block face, and then stamped onto fabric with controlled, even hand pressure.
- A single multi-colour design can require 10 or more separate blocks, each aligned by eye and stamped in precise sequence.
- The Dabu mud-resist technique, practiced in Bagru, adds an additional layer of complexity where a natural mud paste is printed onto the fabric before cold dyeing.
- Every stage of authentic hand block printing is done without machinery. What makes it extraordinary is exactly what makes it slow.
Most people who love hand block printed fabric have never seen it being made. They see the finished cloth, the crisp motif, the depth of colour, the slight variation in the repetition that tells you a human being made this and not a machine. But the journey from a blank length of cotton to that finished piece of fabric is longer, more layered and more skilled than almost anyone imagines.
At Moharis, this process happens every day in our Jaipur workshop. Here is exactly how it works.
Step 1: Choosing and Preparing the Fabric

Everything begins with the base fabric. For hand block printing, natural fibres are not a preference. They are a requirement. Cotton, linen, silk and their blends absorb dye and mordant in ways that synthetic fabrics simply cannot. Polyester and mixed synthetic weaves repel the natural inks and mud pastes that give block printed textiles their character. The process does not work on them.
At Moharis, we work primarily with 100% cotton in a range of weights and weaves depending on the end product. Fine super-soft cotton for lightweight resort wear and scarves. Heavier cotton for home linen, upholstery and structured garments.
Before any printing can begin, the raw fabric must be thoroughly prepared. Fresh fabric carries natural oils, starch from the weaving process and surface dust, all of which prevent dye from penetrating the fibres evenly. The cloth is washed and soaked in warm water, sometimes for up to 12 hours, to remove all of these impurities.
For printing traditions that use natural dyes, particularly the Bagru style, there is an additional preparation step. The washed fabric is soaked in a solution of harda, extracted from the myrobalan fruit, which is naturally rich in tannin. This acts as a pre-mordant, chemically bonding the fibre so it can hold natural colour. It also leaves a faint warm yellowish tone on the fabric before printing begins.
The prepared fabric is then dried completely in the sun before it goes anywhere near a printing table.
Step 2: Block Making, Where the Design Begins
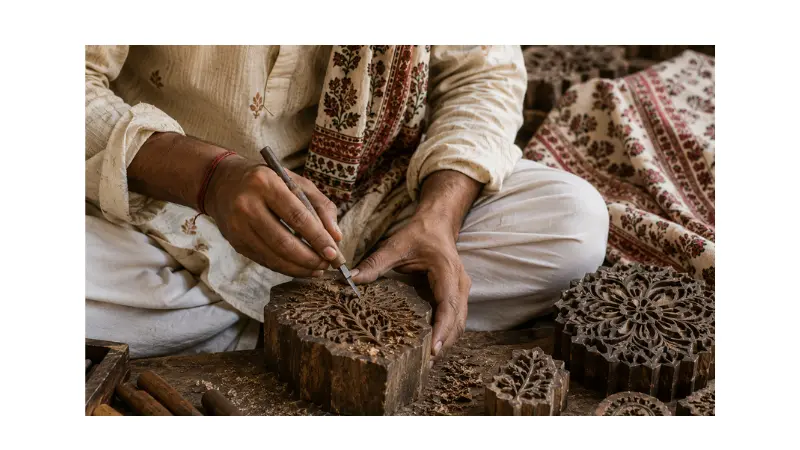
The wooden printing block is the heart of the entire process. And the block itself is made by a completely separate community of specialist craftspeople, the block carvers, whose skill is as demanding and as rare as the printers who use their work.
Blocks are carved from seasoned hardwood, most commonly sheesham (Indian rosewood) or teak. Seasoned wood is critical. Freshly cut timber warps and cracks under the repetitive pressure of stamping and the constant exposure to wet dye. Only wood that has been properly dried and aged will hold its shape through years of use.
The design is first drawn on paper, then transferred onto the wood surface. The carver works with small steel chisels and mallets, cutting away the wood around the design so that the motif stands raised above the surface. It is the raised surface that picks up the dye and transfers it to the fabric. Everything carved away will not print.
The precision required is extraordinary. A fine buti motif, a small repeating floral smaller than a thumbnail, requires the carver to work at a scale where a slip of the chisel destroys hours of work. Complex motifs can take a skilled carver an entire week to complete.
Before a new block is ever used for printing, it must be seasoned in oil. The block is submerged in cooking oil, traditionally mustard or sesame oil, for a minimum of 10 to 15 days. The wood absorbs the oil deeply, which serves two purposes. First, it strengthens the fibres of the wood, preventing the block from swelling or cracking when it comes into repeated contact with wet dye during printing. Second, it ensures that the raised design surface prints cleanly and evenly without the wood absorbing too much ink unevenly.
After the oil seasoning, the block is placed on absorbent paper for several hours to draw out the excess oil before it is ready for use. A well-maintained, properly seasoned block can last for many years and thousands of impressions.
Step 3: Preparing the Colour
Colour preparation varies significantly depending on which printing tradition is being used.
In the Sanganeri style, pigment pastes are prepared by mixing AZO-free dyes or traditional organic inks with a binder and thickener to create a consistency that transfers cleanly from block to fabric without bleeding or spreading. The paste must be thick enough to hold the detail of the carved motif but fluid enough to transfer fully with a single stamp.
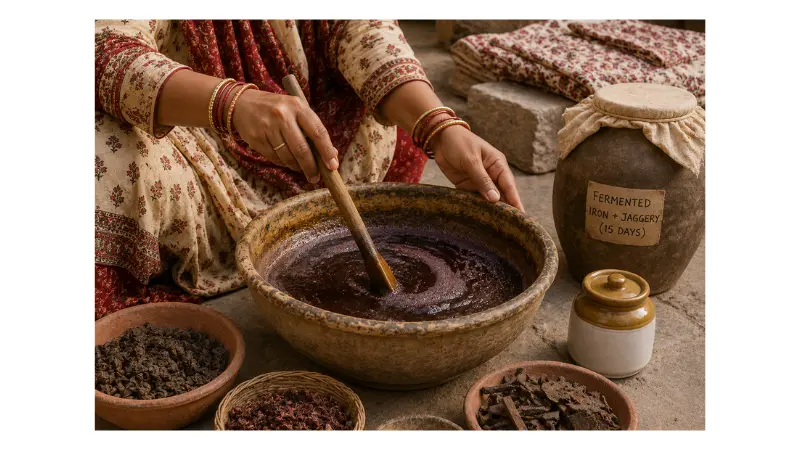
The traditional Sanganeri black ink, Syahi, is made by fermenting scrap iron with jaggery and water, a process that takes days to mature and produces an iron-acetate solution that reacts with the tannin in the prepared fabric to create an indelible black. The red ink, Begar, is an alum-based mordant paste that develops its full colour only after the fabric is washed and dried.
In the Bagru natural dye tradition, colours are prepared from plant and mineral sources. Indigo blue comes from the Indigofera tinctoria plant. Deep reds come from the madder root. Blacks come from iron mordant. These dye baths are prepared and maintained carefully, as natural dyes require precise conditions of temperature, pH and fermentation to perform consistently.
For Dabu mud-resist printing, an entirely different preparation runs in parallel. The resist paste is mixed from black clay, lime, natural tree gum and rotten wheat chaff. This paste must reach the right viscosity, thick enough to stay put on the fabric surface during drying and cold dyeing, but not so stiff that it cracks prematurely before the dye bath.
Step 4: Setting Up the Printing Table
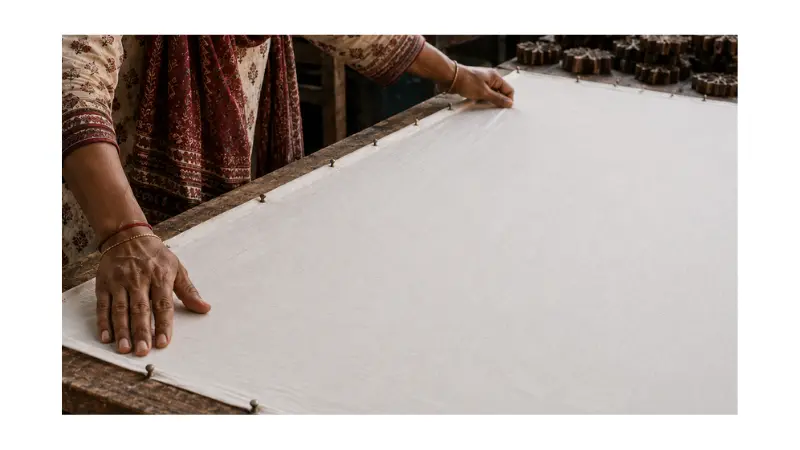
The printing table is a long, low surface padded with multiple layers of jute and thick cloth. This padding is not decorative. It serves a critical function. When the block is pressed down onto the fabric, the slight give of the padded surface allows the entire raised design to make full, even contact with the cloth beneath. A hard surface would cause uneven impressions, with the centre of the block printing darker than the edges.
The prepared fabric is stretched out flat across the table and either pinned or lightly gummed in position. Uniform tension is essential. Any ripples or loose sections in the fabric will cause the block to make imperfect contact, resulting in blurred or incomplete impressions.
A separate colour pad is set up alongside the printing table. This is typically a flat tray or frame with a stretched piece of wool or thick fabric saturated with the colour paste. The block will be dipped into this pad between each impression to reload with dye.
Step 5: The Printing
This is the stage that looks deceptively simple and is anything but.
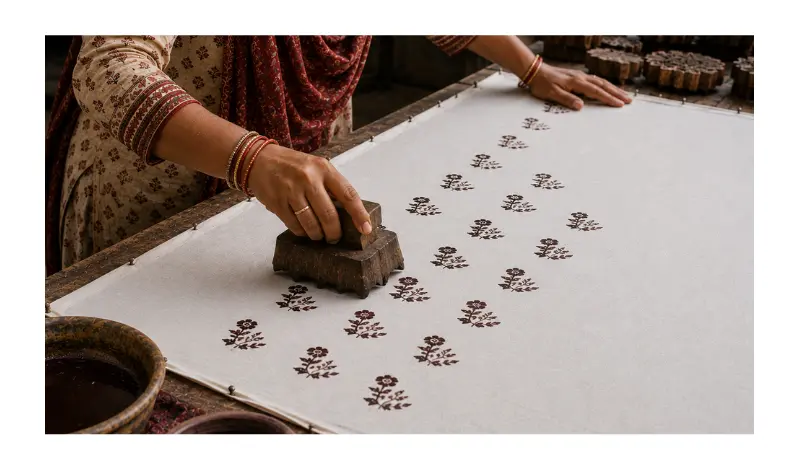
The artisan stands or squats at the printing table, the colour pad within easy reach. The block is pressed face-down onto the colour pad and lifted with a slight rocking motion to distribute the dye evenly across the entire raised surface. Too much colour and the motif bleeds. Too little and the impression is faint and incomplete.
The block is then carried to the fabric and positioned using the eye alone, guided by a faint registration mark or by the edge of the previous impression. It is pressed firmly and evenly onto the fabric. The artisan uses the heel of the palm and, for larger or heavier blocks, a single downward strike of the fist to drive the block down with enough pressure to transfer the full design cleanly.
The block is lifted cleanly, repositioned and pressed again. And again. Across a full length of fabric for a dress with an all-over pattern, this action may be repeated four hundred or five hundred times.
Even pressure across the entire block face is the central skill of block printing. Press harder on one side and that side prints darker. Lift the block unevenly and the motif smears. An experienced artisan maintains consistent pressure over hours of work through muscle memory built over years of practice. This is why a master printer and a beginner are not the same. The difference is visible in every impression.
For designs with multiple colours, each colour requires a different block. Once the first colour is completely printed across the full length of fabric, the fabric dries, and the next block is applied in the same way, aligned precisely with the first. A complex Sanganeri design with fine florals and detailed fills can require ten or more separate blocks applied in careful sequence, each one registered by eye to the impressions already on the fabric.
Step 6: Dabu Mud Printing, an Additional Layer
For fabrics being made in the Bagru Dabu tradition, an additional printing stage happens before the fabric goes into the dye vat.
The Dabu resist paste is loaded onto a separate printing pad and applied to the fabric with carved wooden blocks in the same way as direct colour printing. But instead of transferring colour, the Dabu block transfers the mud paste onto the areas of the fabric that should remain uncoloured after dyeing.
Immediately after the mud paste is stamped, fine sawdust is sprinkled over the wet resist. The sawdust sticks to the mud and seals it, preventing the paste from smearing during handling and creating a protective crust over the motif as it dries. The fabric is then left to dry completely in the sun before it moves to the dye bath.
This additional stage requires its own set of skills. The mud paste behaves differently to dye. It sits heavier on the block, it dries faster on the pad and it must be applied with enough pressure to adhere fully to the fabric surface without spreading beyond the edges of the motif.
Step 7: Drying After Printing
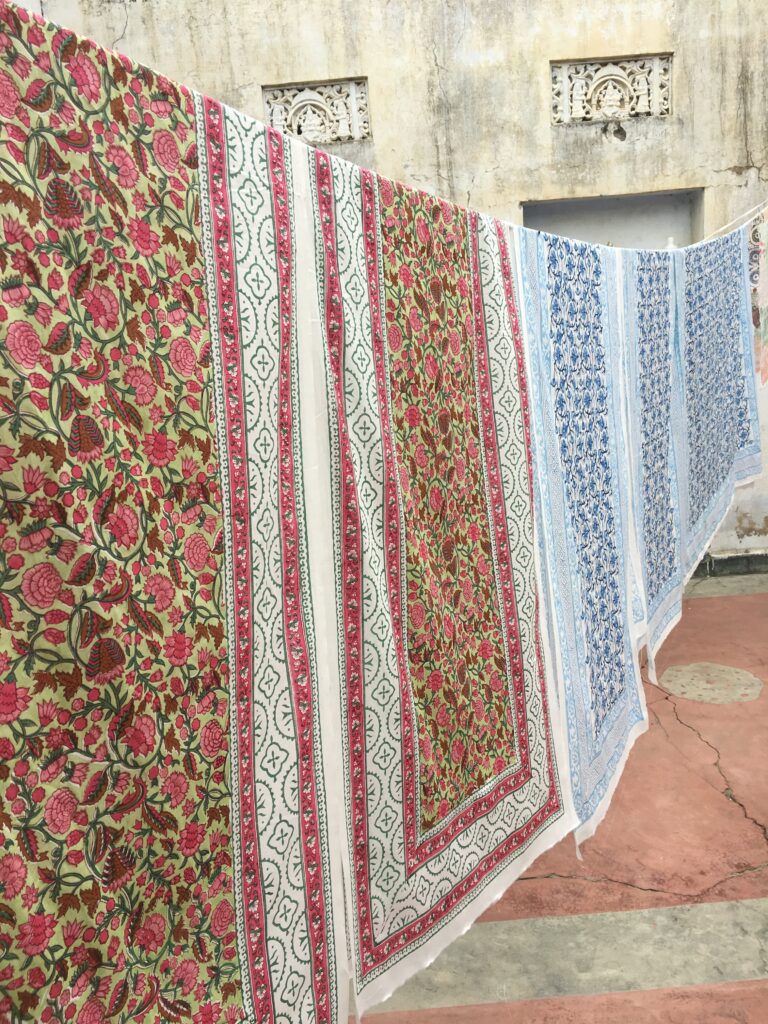
After printing, whether direct colour or Dabu resist, the fabric is hung or laid flat to dry completely before the next stage. Drying in natural sunlight is preferred. Certain natural dyes begin to develop and deepen in colour during sun exposure, and the UV light plays a role in the early fixing of some pigments.
For Dabu fabrics, the drying stage is critical. The mud resist must be fully hardened before the fabric enters the cold dye vat. If the mud is still soft, the dye bath will dissolve it and the resist will fail, flooding the protected areas with colour.
Step 8: Dyeing, Washing and Finishing
For direct-printed Sanganeri fabrics, the final transformation happens during Tapai, the sun-bleaching and fixing stage. The printed fabric is laid out flat outdoors and sprinkled continuously with water over several days. This combination of sunlight and mineral-rich water simultaneously fixes the dyes deep into the fibres and bleaches the hard-yellowed background back to a brilliant white, bringing out the full contrast between the white ground and the coloured motifs.
For Dabu fabrics, the printed and dried cloth is immersed in a cold natural dye vat, most typically indigo. The process must use cold water throughout. Heat dissolves the mud resist and destroys the pattern. After dyeing, the fabric is vigorously washed. The hardened mud crust breaks away to reveal the original light fabric colour underneath, standing out against the deep dyed background. The characteristic soft, slightly hazy edge around each Dabu motif, where the dye crept very slightly into the micro-cracks of the mud during immersion, is one of the clearest marks of an authentic Dabu print.
After all dyeing and washing is complete, the fabric is laid out flat in the sun to dry fully. It is then inspected carefully for any printing faults, colour inconsistencies or alignment issues before it is folded, measured and prepared either for cutting and stitching into garments or for shipping as fabric to wholesale buyers.
Why This Process Cannot Be Rushed
The entire process from fabric preparation to finished cloth takes multiple days for a single batch. There is no shortcut that does not compromise the result.
Block seasoning cannot be rushed. Colour fermentation cannot be rushed. Mud resist drying cannot be rushed. Sun bleaching cannot be rushed. Every stage requires its own time, and the quality of the finished fabric depends on respecting each one.
This is what separates genuine hand block printed fabric from machine-printed imitations. Machine printing can produce a visually similar result in minutes. But it cannot produce the depth of colour that comes from natural dyes absorbed slowly into prepared natural fibre. It cannot produce the organic texture of a Dabu resist edge. It cannot produce the slight, beautiful variation in pressure and alignment that tells you a skilled human being made this, not an algorithm.
Our sustainable manufacturing process at Moharis is built entirely around these traditional methods, with no compromise on the integrity of each stage.
What to Look for in a Genuine Hand Block Printed Fabric
If you are sourcing hand block printed textiles for your brand or boutique, these are the physical markers that confirm authenticity.
Slight variation in the repeat. No two impressions in a hand block print are perfectly identical. Pressure, colour load and alignment shift subtly across the length of the fabric. This variation is proof of the handmade process.
Colour on the reverse side. Because a wooden block presses liquid dye into natural fibre under significant manual pressure, genuine block prints show clear colour penetration on the reverse side of the fabric. Machine surface printing sits on top of the cloth and leaves the reverse largely plain.
Visible block join lines. Where one block impression ends and the next begins, a faint line is visible on close inspection. In skilled Sanganeri work these are nearly invisible. In Bagru work they are openly visible and considered part of the fabric’s character.
The Dabu haze. In Bagru Dabu printing, the edges of light motifs carry a soft, slightly blurred border caused by the dye seeping into micro-cracks in the mud resist. This effect cannot be replicated by machine.
A Process Worth Understanding
Hand block printing is slow because it cannot be anything else. The speed of the process is the speed of a skilled human being, working with carved wood and dye, making decisions with every impression.
When you hold a piece of genuine hand block printed fabric, every hour of that process is in your hands. The week a block carver spent on the motif. The days the fabric spent soaking and bleaching. The hundreds of individual stamps an artisan made across the length of the cloth.
That is not inefficient. That is craft.
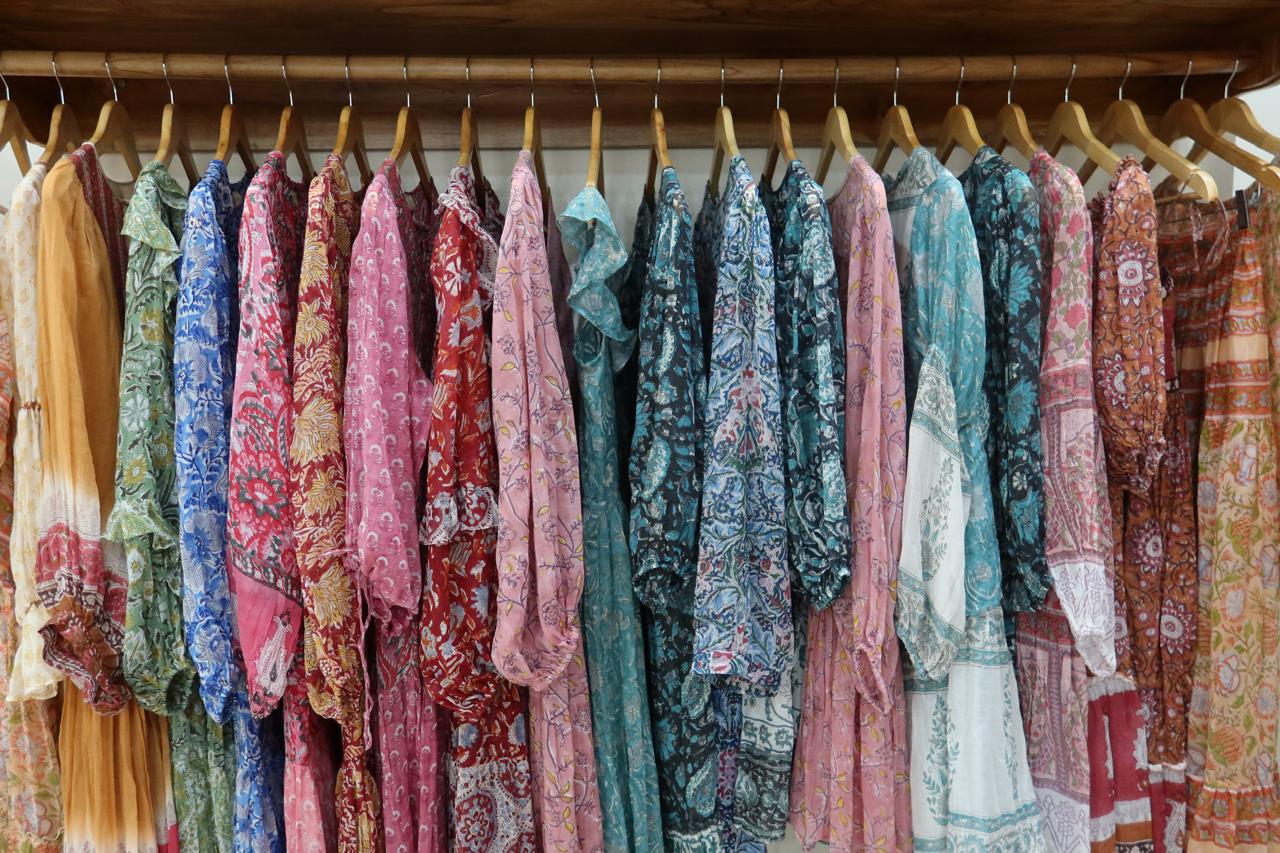
Explore our wholesale catalog of hand block printed clothing, fabrics and home linen at Moharis, or learn more about the artisans and community behind every piece we make.
Moharis is a Jaipur-based manufacturer, exporter and wholesaler of hand block printed textiles. We work with boutiques, sustainable fashion brands and sourcing companies across the USA, Europe and the Middle East. For wholesale inquiries, write to us at info@moharis.com or visit our wholesale page.